Portable Class Libraries
Portable Class Libraries were added as a project type in the interest of creating an assembly that you could use across the .NET Framework, Silverlight, Windows Phone 7, or Xbox 360 platforms without modifications. Well, not really that easy. There is some work to do and as you get into the development of PCLs you'll find out that there is really a sliver of what you'd hope is supported. (
http://msdn.microsoft.com/en-us/library/vstudio/gg597391(v=vs.110).aspx)
MVVM Light
Where I have found it for me is in Windows Store and Windows Phone (7.5 and 8) with
MVVM Light. I have been using this MVVM framework exclusively for a few years now on Silverlight, WPF, Windows Phone and now Windows Store platforms and each release gets better.
Most recently, another MVVM Light fan,
Oren Novotny (
@onovotny) ported the MVVM Light project and made it possible to use it in a Portable Class Library. This is great, code reuse is the ultimate time saver. And when developing Windows Store Apps or a Windows Phone App; making a complimentary piece for the other just makes sense when the UI is really the only difference and even that is almost the same.
Example Project
Open Visual Studio 2012 and create a new project. I like to start with the "
Other Project Types" and select the Blank Visual Studio Solution; name it
MvvmPortable and click save. Next add a Windows Store App (C# Blank Template) and call it
Mvvm.Store. Add a new Windows Phone 8 project to the solution named
Mvvm.Phone.
Now add a new project to the solution and select the "
Portable Class Library" project type.
Click OK and then you'll be presented with a dialog to choose the platforms to be supported. Select all except XBox and for
Windows Phone choose 7.5 or higher. (
An error will occur when adding the nuget packages later if the 'Windows Phone 7.1 or higher' option is chosen).
Click OK and now the MVVM Light packages can start to be added via nuget.
Nuget
If you are not using nuget, please pause here and go to
nuget.org and/or install via Tools->Extensions And Updates.
Mvvm.PCL Project
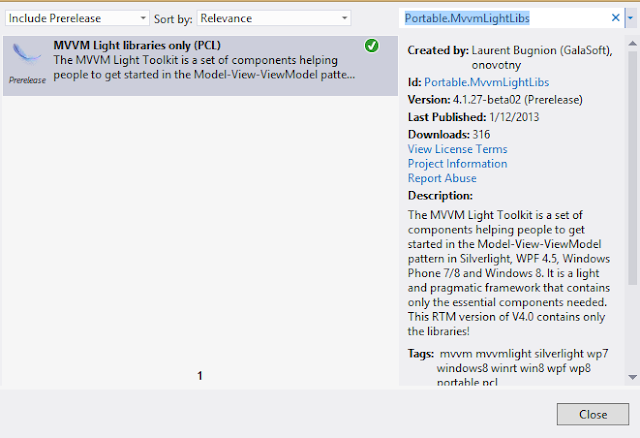
Right click the project and select the Manage Nuget Packages and in the dialog search for "
Portable.MvvmLightLibs" and be sure that the Include Pre-release option is on, or you can use the package manager console and use the command
install package portable.mvvmlightlibs -prerelease.
Repeat this process for the Windows Phone and Windows Store projects.
Next we need to add the MVVM Light specific platform assemblies to each of the respective platforms and do some setup and cleanup to make this all work.
Right Click the Windows Store project, select Manage Nuget Packages and search for MVVM Light and click the install button. In doing so, a few folders and files will be added to the project and you may see some errors which we'll clean up and repeat the process for the Phone project.
Moving ViewModelLocator,ViewModels and Wiring it Up
Now on to the fun!
In the Mvvm.PCL project create a folder call ViewModel in the root of the project. Then expand the ViewModel folder in the Mvvm.Store project and select the ViewModelLocator.cs and MainViewModel.cs file and cut and paste those to the ViewModel folder in the Mvvm.PCL project.
Open each of those and change the namespace to Mvvm.PCL.ViewModel from Mvvm.Store.ViewModel.
Since the ViewModelLocator has moved, the store app needs to know where to find it and the ViewModels, so open the App.xaml file in the Mvvm.Store project and change:
xmlns:vm="using:Mvvm.Store.ViewModel"
to
xmlns:vm="using:Mvvm.PCL.ViewModel"
and we need to modify the Resources section because the nuget installer for MvvmLight puts in some extra entries for the ViewModelLocator
<ResourceDictionary>
<vm:ViewModelLocator p7:Key="Locator" p8:IsDataSource="True"
xmlns:p8="http://schemas.microsoft.com/expression/blend/2008"
xmlns:p7="http://schemas.microsoft.com/winfx/2006/xaml" />
<ResourceDictionary.MergedDictionaries>
<!--
Styles that define common aspects of the platform look and feel
Required by Visual Studio project and item templates
-->
<ResourceDictionary Source="Common/StandardStyles.xaml" />
</ResourceDictionary.MergedDictionaries>
</ResourceDictionary>
Finally for the Store app we'll go to the MainPage.xaml and set the DataContext and add a TextBlock to be filled from the MainViewModel.cs in the portable class library that we'll add following that.
In the MainView.xaml page add the DataContext property at the top of the page after the other declarations.
...
xmlns:mc="http://schemas.openxmlformats.org/markup-compatibility/2006"
mc:Ignorable="d"
DataContext="{Binding Main, Source={StaticResource Locator}}"
>
Next in the grid add the TextBlock as follows
<Grid Background="{StaticResource ApplicationPageBackgroundThemeBrush}">
<TextBlock Foreground="White" FontSize="42" Text="{Binding Hello, Mode=TwoWay}" />
</Grid>
If you compile the store project at this point you will get some errors concerning MvvmLight confilcts. These occur because there are class duplicates in the portable and in the specific versions of the assemblies. In order to alleviate the errors, expand the references folder in the project and select the *.Win8 assemblies and delete them.
Adding Hello to MainViewModel
Now that the wiring up of the relocated ViewModelLocator and MainViewModel are completed we can add the simple "Hello" property in the MainViewModel so it can be bound to in the store project.
Open MainViewModel.cs and add the property as follows:
private string _hello = "Hello";
public string Hello
{
get
{
return _hello;
}
set
{
_hello = value;
RaisePropertyChanged(() => Hello);
}
}
Set the store project as the default project to run and either run in the simulator or on your local machine and you should see "Hello" appear in the top left of the application.
Wiring up the Phone Project
The process here is pretty much the same as was done for the store project. Instead of moving the ViewModel folder in the phone project; it can be deleted.
Open the App.xaml and make the adjustments to let the application know where the ViewModelLocator and ViewModels are located. Note that making these references in the phone project are different that in the store project, albeit subtle can trip you up.
Change
...xmlns:vm="clr-namespace:Mvvm.Phone.ViewModel" mc:Ignorable="d">
to
...xmlns:vm="clr-namespace:Mvvm.PCL.ViewModel;assembly=Mvvm.PCL">
then make the modifications to the Application.Resources portion as follows:
<Application.Resources>
<local:LocalizedStrings xmlns:local="clr-namespace:Mvvm.Phone" x:Key="LocalizedStrings" />
<vm:ViewModelLocator p6:Key="Locator"
p7:IsDataSource="True" xmlns:p7="http://schemas.microsoft.com/expression/blend/2008"
xmlns:p6="http://schemas.microsoft.com/winfx/2006/xaml" />
</Application.Resources>
Next, open the MainPage.xaml and add the DataContext declaration and the TextBlock as we did for the store application.
...
shell:SystemTray.IsVisible="True"
DataContext="{Binding Main, Source={StaticResource Locator}}">
adding the TextBlock
<Grid x:Name="ContentPanel" Grid.Row="1" Margin="12,0,12,0">
<TextBlock Text="{Binding Hello, Mode=TwoWay}" Foreground="White" FontSize="18" />
</Grid>
And finally as mentioned in the store project, you will get the assembly conflicts so be sure to remove the .*WP8 references in the phone project prior to building the solution here.
Run the application and you'll see the Hello presented in the same location on the phone app.
Wrapping Up
All of the other capabilities that you may or may not be familiar with in the MVVM Light framework is still available to you within the specific projects or of you'd like extract those as well too. I find that the navigation and switching of the views is still best served within the specific platforms.
I have in my projects moved services negotiation for getting data into the PCL assembly using the Microsfoft.BCL.Async library via nuget too and that is also great but a little different depending on your experience with the platform and WebClient versus HttpClient requests.
Enjoy and feel free to ask questions.
Part 2 - Adding a Data Service


